Tuesday 27 March 2018

Going and Growing

Well it's been a couple weeks since I've given you an update on my seedling happenings! So here we go!
Stuff is growing decently! I've had not-amazing luck with seed germination rates this year... And I'm attributing that to my own adjustment from being a window gardener to a grow-light gardener... Some seeds got too much heat from the wrong kind of bulb I think, and some may have been too cold in the basement, and some maybe too wet, cause the water didn't evaporate as I expected it to... All in all, a few plants from most kinds of seeds though!

HOLLYHOCKS! 
I haven't had very much luck with my hollyhocks... I'm pretty bummed about that, but c'est la vie! And live'n'learn!
Black hollyhock seeds: only 7 out of 48 seeds sprouted.

multi-color mixed hollyhocks: only 4 out of 48 seeds sprouted... :(
I haven't totally given up hope yet... The black ones were transplanted last week and are doing well in their new homes. starting to work on their first set of true leaves. And the colored ones are looking pretty sad. I'll let them recover before transplanting. Their seed-leaves look almost burned or damaged...

I e-mailed the seed provider from amazon about several varieties that didn't seem to germinate well, and she had some tips. Specifically hollyhocks can be soaked and even scarred but she said that stratification may have significantly lowered germination rates... and I'd say she's right! :( the research was so mixed on whether to do it or not, but oh well! Live and learn! I may buy some more seeds yet.
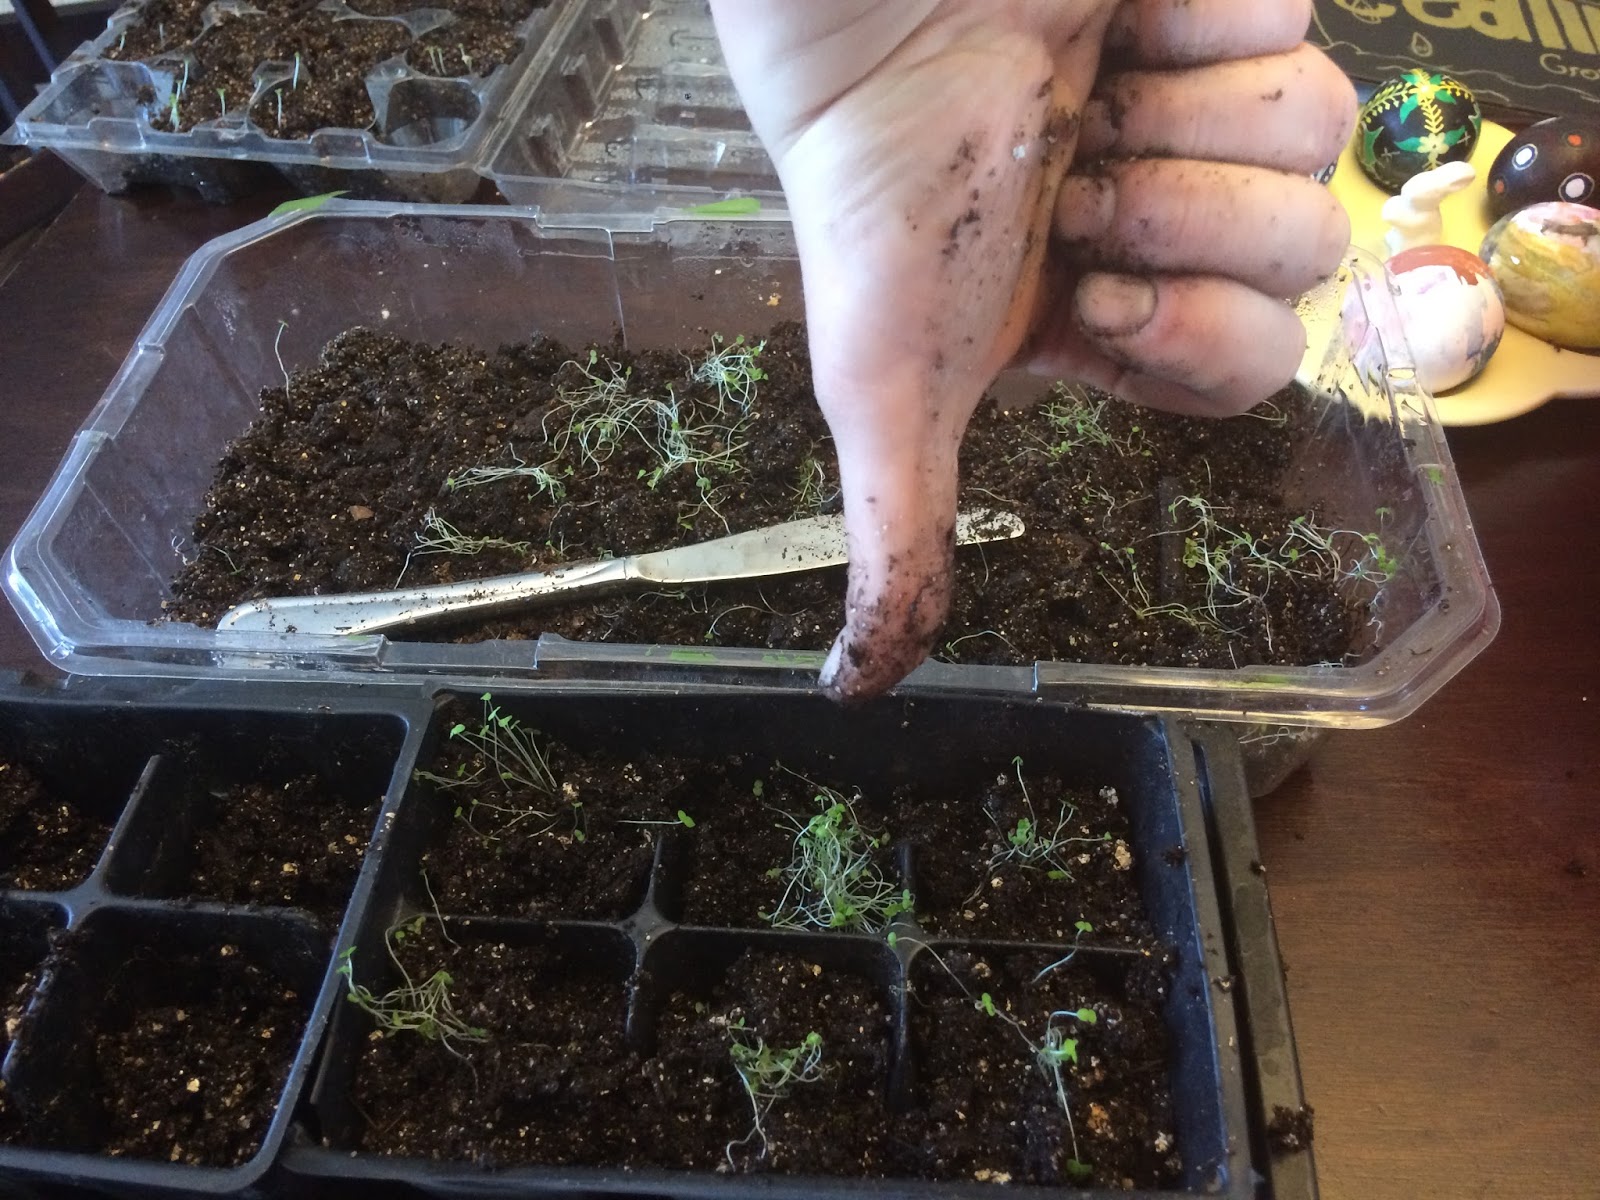
Transplanting black hollyhocks: I used the end of a paint brush to delicately lift them out of the loose soil.
they transplanted very well.
DELPHINIUMS! 
I also talked to the Nikovita seed lady about my Delphiniums which aren't doing much at all... Sadly, she informed me that they need to have no light exposure! bah!! see? Even the greenest of thumbs, only gets good at gardening, by making mistakes along the way! So These seeds haven't done well being placed on top of the soil, and then under a grow light! lol! I guess they do well at my parents cabin because the seeds fall on the soil and then get covered by autumn leaves so they are both shaded, but on top of the soil... If Nikovita still has some in stock, I may try growing these again.
probably almost a hundred seeds in this container of delphiniums... and only five sprouts. I will let them get bigger before transplanting.
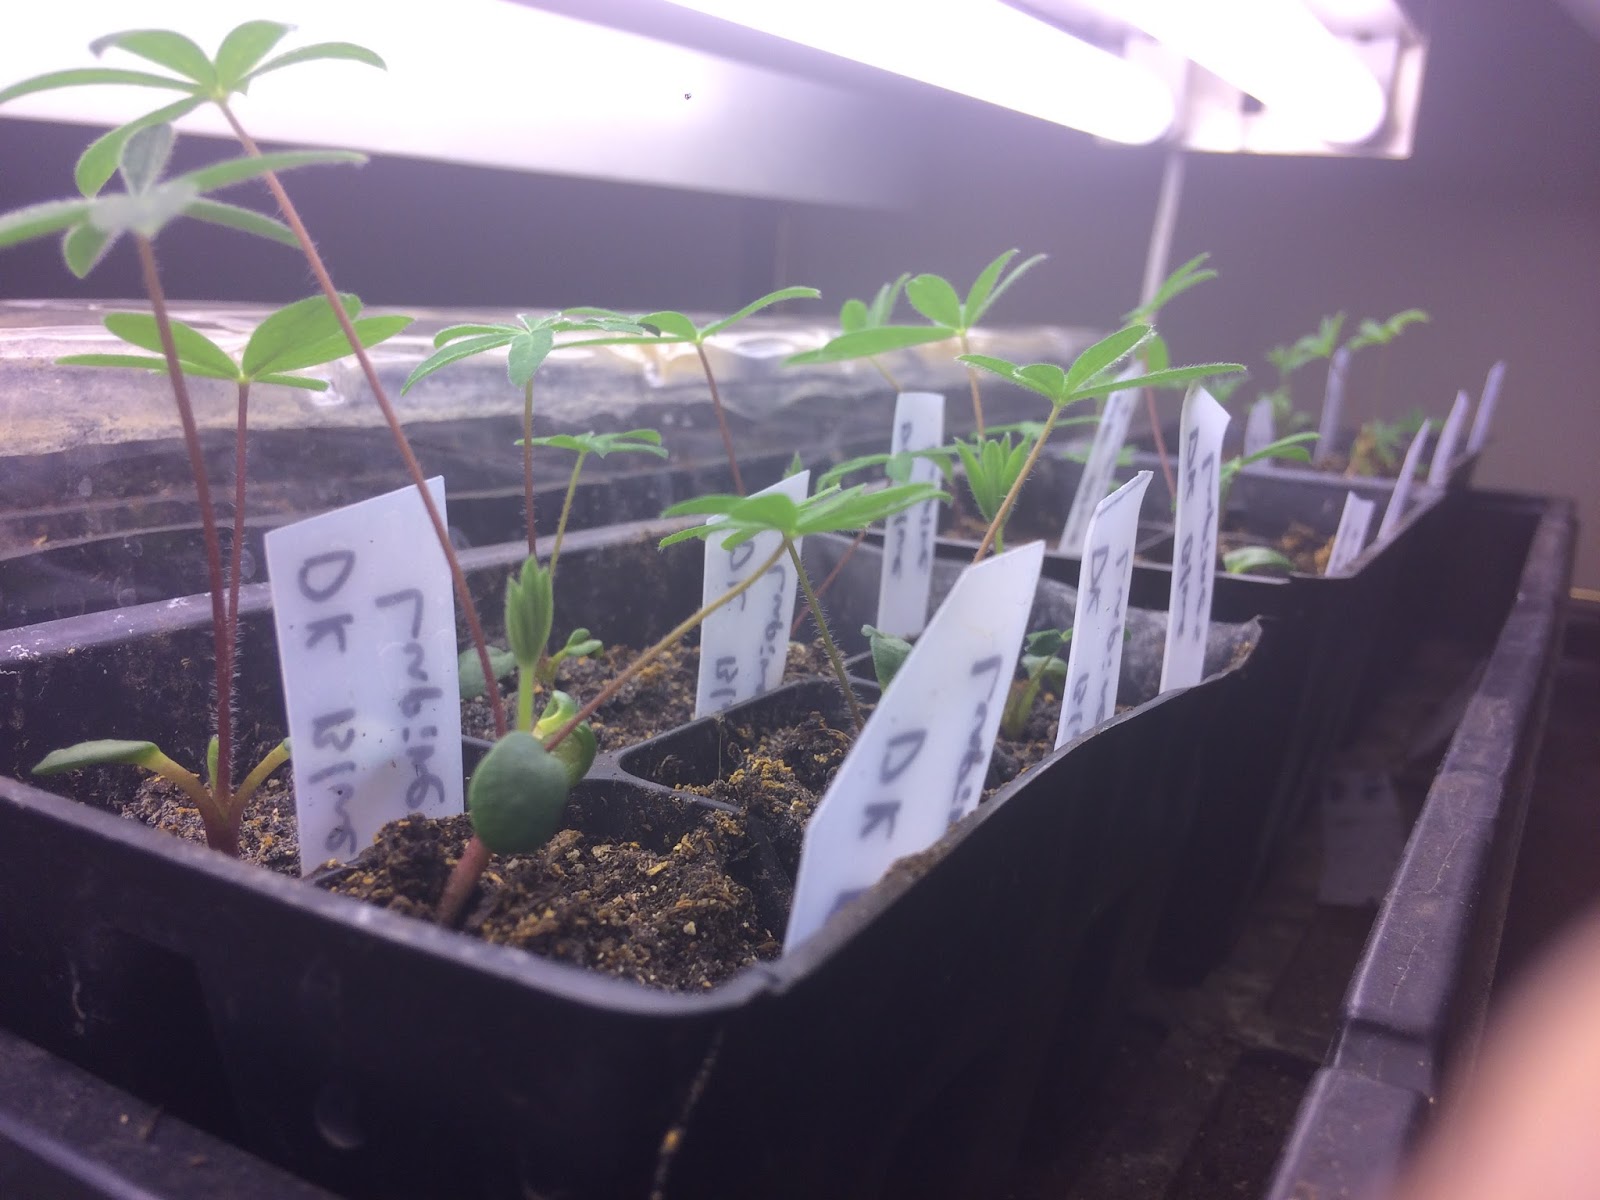
LUPINES!
These things are doing awesome! And Nikovita confirmed that these were sewn properly. scarification, stratification and then sewed under a cooler grow light (not one that emits heat)
So hey! At least I'll have some pretty Lupines this year LOL!

TOBACCO!

Tobacco has been very slow growing, so I'm glad I started it as early as I did!
2 weeks of post-germination growth. very small.

 I have had some "damping off" happening with the second round of tobacco sprouts I transplanted... With most of my seeds, the initial quicker sprouts have proved to be the strongest plants with the most vitality. Damping off has to do with either too-moist of soil, or with mold growth in the soil that rots the stem right at soil level, killing the plant. I still have several tobacco plants left though, so I'm not too worried about the ones that dampened off.

I haven't noticed any particular tobacco-like smell to them at all yet, but they are only just working on their first sets of true leaves.

SNAP DRAGONS!
I did re-seed my snapdragons last week, because I did them too thick to transplant last time!! this time i sewed them much more sparsely, and they have done very well. Again almost 100% germination rate. And this time it should be easier for me to divide these and transplant them better.

As I suspected, about 80% of the previously transplanted snappers have died off. but there's a few resilient strong ones sticking around. And those are exactly the kind of snap dragons I'd like to grow and save seed from anyways. A little survival of the fittest--when seeds aren't in short supply-- is just fine with me!

FORGET-ME-KNOT AND HYSSOP:

Ah yes, most of us bible-thumpers right away think of "cleanse me with hyssop"... :) Hyssop is in the mint family and is an awesome herb! I don't know why it's not more popular! My plan is to interspurse it in my garden with other plants, so it can keep away bugs and pests. It's touted as being good for repelling cabbage worms too!

left, thicker plants are hyssop. Right smaller ones are forget-me-knots.

 I have been very impressed with the germination of my hyssop seeds! These are from Heritage Harvest Seeds, a company I highly recommend for seed purchasing (no, I'm not sponsored. This is a genuine recommendation with zero pay-out to myself).

 My forget-me-knot seeds have also had an almost 100% germination rate! These I seed-saved last summer as well. My seed-saving has been paying off big-time this year. So far, they have all worked flawlessly. with flower seeds, the trick is to let the flower fully die on the plant, so the seeds can mature properly. But still watch it carefully enough to harvest the seeds before they fall off naturally and disappear.

PEPPERS!

Peppers have been doing pretty good! Again, germination rates weren't amazing, but I really think this was because of my hotter grow light making it an unpleasant environment for the seeds to grow. I've just unscrewed those bulbs from a few spots... I'm not happy with them. I'll be sticking to the cooler tube lights in future.


The first stronger sprouts are already working on their second set of true leaves, while the later sprouts are quite a bit smaller, and working on their first set of true leaves.


GROUND CHERRIES

The ground cherries and the Tobacco are growing at roughly the same rate. Actually the ground cherry is almost a bit quicker! Ground cherries grow very slowly. By the end of the entire summer, my ground cherries were still very small plants... So I'm hoping I'll have a head start on them this year! In my later sprouted seeds, I had several that just died for no apparent reason. They didnt rot on the stem, the leaves just withered and it died. But my ground cherry seeds were seed-saved. So perhaps not all the seeds were mature enough to grow a true plant, is all I can think of. I still got some plants though! :) Last year I only had one plant. So i'm already ahead that way.  Again, like the others, my initial sprouts are doing stronger and better than the second round of transplants, which are getting some damping off die out.

RHUBARB!

Well, i'm down to only ONE Ukraine rhubarb plant... but if you've ever had rhubarb grow in your yard, you know that one is plenty! :) So i'm still optimistic I can keep this thing alive! lol! I have several manitoba ones, but they don't look as big or vibrant just yet!
large round leaf is on the Ukraine rhubarb plant. Mb rhubarb much smaller, and struggling, but alive.
I'm hoping the Manitoba rhubarb will look healthier as it grows. They had some transplanting damage, as one of my tube light bulbs fell right on top of them lol! So they might actually be a little bruised or burned from that even. But still thriving despite their battle wounds! 

NEEDING MORE LIGHT SPACE!! 

Well, thats all the updates for today! In the next couple of days, i'll be transplanting the forget-me-knots, the hyssop, and the snap dragons. By then I'll have a full over-flow on my plant table. But luckily for me, plants only need 12 hours of sunlight! I can actually run two full sets of plants on the plant light, by giving the trays a day or night shift of 12 hours.

 So my less important plants (AKA flowers) will be on a reverse sunlight schedule, and get darkness during the day, and plant lights at night, after the transplantation occurs. I'll somehow revert them back when i'm able to move everything outdoors.

The reason I say my "lesser" plants, is because I'm a strong believer in the moon's affect on a plant! I have no idea what it actually does, and this is not scientific, simply my own nature-loving-folkways I'm creating... but if the moon DOES play a role, I don't want to mess up my veggie plants by not allowing them a proper night time, at night with the moon's gravitational pull and whatnot. (feel free to think I sound crazy! haha!). Flowers are just flowers. They generally don't have as much of a life cycle like veggies do (other than perennials). They flower till they die from frost. So that being the case, I care less if their  biological clocks get messed up by being on the night shift.


Anyways! Thats it for now!
Until next time, KEEP IT GREEN! :)

Tuesday 20 March 2018

a strange flower


There once was a flower, planted by a gardener. Now, this was no ordinary flower… in fact, it wasn’t even a particularly eye-catching flower… But the gardener knew what he was doing, when he chose it. He looked through all the kinds of flower seeds he could imagine, and decided to pick one that was different from the others around it. An unpredictable flower that didn’t grow in an expected way. This flower grew to its surroundings, not to a blueprint inside. Almost as if it was both unaware of its nature as a flower, and yet so very very aware…

 The stem of the flower was like a bizzare maze above the flower bed. Twisting and turning. Up and down, swelling bigger and smaller. Such a strange sight... If the wind blows left, it will grow left. If the sun shines, it will grow up. When there are clouds, it lowers and opens up to the rain like a sponge. With heavy winds, it bends. With snow, it’s roots go deep… This flower was not like the others in his garden so far. The others were much brighter, and healthier looking. They grew in a predictable way, which made for a beautiful garden bed.
But the gardener knew what he was doing when he chose to plant the unusual flower. You see,  When the wind blew, the flower bent to cover other flowers. When it opened up to the rain, it helped stop other flowers from drowning. When it grew left or right, it created wind-breaks for more delicate flowers. And with it’s deep roots, it would come back year after year, creating a better environment for hundreds of flowers to come…

But one day, the special flower looked around at the garden and was sad… The unique flower wanted to be like everyone else. So, the next time the winds blew, the flower stiffened it’s neck and grew a woody stem. When it rained, the flower closed up. When the sun shone, the flower decided to stay where it was, like all the other flowers. When the cold days approached, the flower shrunk back like everyone else…

As a result, many flowers broke in the wind. Others were scorched by the sun. Some even rotted from too much rain. Others, without the root protection of the special flower, were touched and harmed by frosty nights… Oh the special flower did look like the others now… Thirsty for sunshine, parched for rain… cold and shrunken… The flower looked so much like the other flowers, that the gardener couldn’t find it. “where is my special flower? The one I placed in my garden with a unique purpose?” he would say when he went out there.

It would only be a matter of time, before any decent gardener would uproot the rebellious flower and plant a new seed in it’s place… Let alone the perfect gardener. 

But as I just said, this gardener was perfect. And he DID manage to spy into the flowers and find a small, shrunken, woody stemmed plant that he didn’t recognize. It didn’t seem to have a purpose, and wasn’t what he had intended… little more than a weed amongst the flowers…

The perfect gardener though, he didn’t pull it out. No… instead he gave the flower room. He took the flower’s head and pointed it at the sun. He slowly bent the stem a little bit each day, until it was more flexible. He would stand in the pouring rain, to hold open the petals of the flower, so it could drink the rain. Yes…the gardener literally did all the work of the flower, until the flower could remember who it was…

The flower was made by the gardener with a purpose. And after what the gardener did for that little flower… well… That flower went on to be one of the most glorious and spectacular flowers in the garden. A flower the gardener was proud to announce to all who entered his garden “here is my special flower. I created her with a unique purpose, and she makes me proud.”

Thursday 15 March 2018

Sterlizing Soil

well, I was gonna post about something totally different, but I think today I'll just chat about updates on what's been happening under my lights! :) there will be plenty of time in the winter for random gardening topics and experiments.


Well, I decided this week, to be done with my Ukranian Rhubarb seeds. Any that haven't sprouted, appear to have either molded or rotted. Very strange since the soil didnt get any mildew on it at all. Perhaps soaking them was a mistake. Or maybe they were just old seeds. Still, I got 1 or 2 sprouts from them, so if those grow into big rhubarb plants, it was still worth my money and time!

 Just incase it was the soil though, I decided to try a trick I read about. It's called soil sterilization. Because there was mold on some of the seeds, I don't want to re-use the dirt. It may have some mold spores within it. Have you ever tried removing mold from the surface of dirt, and it grows right back? Mold has spores not roots, if specks or dust settle back on the dirt, it'll just re-grow itself. There's two things you can do. One is to sterilize the dirt (like I am demonstrating today), the other, is to spray the surface of your plants and dirt with a 1/3:1 ratio of peroxide and water. The peroxide consumes the mold, and also airates the soil while it's in there! I used this trick lots last year after my seedlings were planted, but the soil got mold. It really works, and it doesn't hurt the plants.

Still, it's nicer to have dirt that doesn't mold in the firstp place. So the other trick, if the dirt doesn't have a viable seedling in it, is to sterilize the dirt in the oven! :)


Just pop the dirt onto a pan, smooth into a 1-3 cm thick layer on the pan, and bake it anywhere from 2-300 for 1-3 hours. Whatever you feel like. this was 200 for about 3 hours. The dirt was still damp which is a good thing because the steam is very hot and helps kill spores. It didn't stink really either. Just a nice earthy smell. Perhaps if you have fresh compost in your soil it might give the air a smell of that, but this was store bought compost, peat moss and vermiculite. So no funky smells here!


LETS MOVE ON! 

Lets move on to whats happening under my plant lights! :)
3 vibrant Mb Rhubarb seeds ready for a transplant in the next day or so.
 I transplanted a few manitoba rhubarb seedlings last week, and a few more have shot up. I'm noticing a pattern of only the outer cells sprouting. I'm thinking my warmer light is too hot on the center cells, and thats why they don't sprout. So i'll lift the light  a little higher up next time. 
closest to us is jalapino peppers, far away is green pepper seeds from the seed swap. These are also due for a transplant.
 My peppers have shown the same affect with the light suprisingly! I've not given up on these though. peppers are native to mexico so I feel like the seeds should tolerate quite a lot of heat one would think. Still, i've transplanted a few, and here come a few more! These are pretty early. I'll have another round of pepper seeds to sew in the coming weeks yet, and i'll do the light higher up for them.

LUPINES!?!?!!?
My stratified lupine seeds had a very high germination rate of 17 out of 18 seeds
 Here we have the long-awaited LUPINE SEEDS!! YUP! 17/18 have sprouted up beautifully! So the scarification and stratification worked beautifully for these! They all look healthy, and some are even working on their first set of true leaves! :)
Some lupines are already getting their first set of true leaves.
You might notice the purple color of the lights on the lupines. These are the plant lights I bought. I was a little nervous when I first screwed them in place, but my research seems to show that most plant lights have a red or purple hue to them... so I'll keep my fingers crossed, and if nothing else, get things outside in the mini greenhouse (one of those metal and clear plastic build-it-yourself structures from home depot for $70) as soon as possible.

NEXT IS MY SNAPDRAGONS!

I'm not terribly impressed with these... but again, they were under a hotter light. So as you can see, only the seeds on the cool edge sprouted. (starting to prove my "too hot" theory a bit). I'd like to wait and see if more sprout, but these are already reaching for light, and tangling up. So it's time to transplant them and separate them out a bit.

 I'll warn you, I'll be losing quite a few seedlings in this method. But this is what happens when you dont take the time to space your seeds out properly. Even the tiniest seeds need a bit of meticulous care, or this happens. Lucky for me, I seed-saved these snapdragons, so there's no $ lost in me losing some seedlings. And I simply started a few more this same day.
 So because of the tangle, I used a butter knife to wedge out a chunk of dirt for these transplants.
 And then whatever actually stuck together (aka had some roots) went into a seedling pot cell together. If they grow stronger and more vigerous, i'll either thin or separate them out farther yet. But for now, i'm not terribly invested in these spidery looking seedlings.
 Here's what they looked like after transplanting. Quite spidery and not terribly pretty. I imagine one or two of the hardiest snapdragons in each cell will spring to life and rise above the rest, producing beautiful blooms, and the rest will die off. Which, again, is totally fine with me here! :)
 But all-in-all, this particular seeding event I would give a thumbs-down.


HOLLYHOCK STRATIFIED SEEDS!

So, they aren't nearly sprouting yet, but the calendar says to plant them... so i will! We'll see what happens! I'm a little more anxious about these ones, less so because each packet costed me $3, but moreso because I LOVE HOLLYHOCKS and if these flop... it's not something readily available at most greenhouses. I really want some.  and they do re-seed themselves once established year-after-year... so i'm really hoping it'll work out!

 The above is already half-way through sewing, but as you can see, there's a bit more color variation in the seeds after stratification, and a little pale arched line around the perimeter of some of them... so I assume these seeds have broken dormancy already when I start this.

 It was difficult to photograph, but I did 2 seeds per egg-cell. My confidence in their germination is low, since none of the direct-sew seeds I did last summer sprouted... :( Yup! This is already year two of me trying to own hollyhocks... REEEAAAALLLY hope this works!

 So I just used a permanent marker (or any pen works) to poke 2 holes in each cell, far away from each other for ease of separating plants later. Plop the seeds in, maybe 1-2 cm deep, and smooth dirt back over them.
I had a few seeds leftover, after doing 2 seeds per cell for 18 cells... plenty...  so I decided to toss them in a milk jug for outside in my milk jug garden, and see what happens. It might just kill them at this point since they've broken dormancy, but hey! so about 30-40 seeds are in there. Well over-planted, but i'll keep an eye on it. Their roots tend to grow down, not out. so I'm still hoping for the best. I gave them a good 4-5 inches of depth in the jug, cutting my rim just below the handle itself.


LASTLY, DELPHINIUM SEEDS!
 Well, this was my take-over of our dining room table actually lol! You'll see my seedling recording binder, as well as my seed binder. I use hockey-card collector sheets, to store all my seed packets, and then I can flip through them and categorize and observe it all. I should point out I also planted a few more snapdragon seeds in an egg carton this time, more sparingly. So experiment #2 for snapdragons is started. :)

 The Delphinium/Larkspur seeds are definitely alive. The color is lighter, and their shells are slightly swollen. So I'm hopeful on these ones. Plus I seem to have better luck germinating tiny seeds in my lifetime for some reason... But...

 Okay, so Delphiniums are officially my LEAST FAVORITE SEED to plant! Oh my word!!!  they are tiny, and they aren't pitch black, but not light... they are precisely the color and size of dirt...

 like... can you see my seeds in this photo? cause there's at least 8 in plain sight on top of the soil... and they are relatively in focus... oh ya! Thats how fun it was! (note the sarcasm). And because I paid $3 for a tiny amount of them, I was diligent to space them out about 3 cm or so, so I can save as many that sprout as possible.


 I used a couple containers for these ones. I did my multicolored Delphiniums in this leftover strawberry clamshell, which already has all the holes I need! And I did the light blue ones, in the egg clamshells...that was easier, cause I just spaced out 5 seeds per egg shell, and I could keep track of which compartments had seeds and which didn't simply from memory, not blind-sight!
 IT'S IMPORTANT TO KNOW WHAT EACH SEED NEEDS!! I'm glad I read the baggie for delphiniums, because you DON'T BURY THEM! you simply sew them on top, and press them down into the soil. If sewing outside, she recommends walking on them actually.  I'm a little nervous about them drying out... but I'll be diligent about watering them.
And that's it for this week! You can see my new plantings behind me here (yes I am dressed... it's my workout shirt lol! I wasn't gonna wear good clothes for dirt digging... ;) )

Until next time, Keep those thumbs green!! :)

Wednesday 7 March 2018

Breaking dormancy in seeds!

Okay, really... I know I just posted two days ago, but man! This is rush hour in the green thumb life! :) Lots of springtime posts, and likely less when fall comes to a close... so enjoy it while it's here!

If you are one of my eager-beaver followers (AKA, if you're my mother lol!) then by now, you've been able to try your green thumb out in a couple of ways!

- plan what seeds you want to buy
- do any online ordering already
- started collecting coffee grinds and egg shells for the garden
- keeping an eye on kijiji for plant growing stands
- written out a schedule of when to start your seeds indoors or outdoors

Yup! You can already have completed all of these tasks by now! :) Don't worry if you haven't though. It's still pretty early, especially if you'll be using your window sill for seed starting. there just arent enough hours of sunlight quite yet, though its getting nearer! :)

If you've done all this, you might now find yourself with a handful of seed packets, a garden plan, and eager anticipating hands!! :) So now I want to talk about something i'd never considered in seed-starting until this year, when I read that seedling book! :) Seed dormancy.

All seeds go dormant for a season. That's how they preserve themselves. If they didn't, tree seeds would sprout right before a heavy frost in the fall, and they would die. It's a survival technique. For most seeds, they require something specific in order to break dormancy. Seeds are all different, but knowing this (as you may have noticed in my previous post) can drastically increase the germination time and rate of your seeds! This is especially important for expensive or rare seeds you want to ensure success with.

Light: Some seeds, require light exposure for germination. This can be a bright flash of intense light, or prolonged exposure to less intense lights. Either way, I've started waving a bright light over my seeds for about 20 seconds before I sew them.
holding a bright light over my rhubarb seeds for 20 seconds before sewing

water: some seeds will germinate faster, if they are soaked for 1, 12, or 24 hours. Be sure to do your research though. for example, beans and peas, if you soak for 24 hours, you'll just get beans and peas you can use in chili!! :) make sure you soak seeds appropriately. Google is a wealth of information on this topic. this information is very readily available.
Rhubarb seeds don't need soaking, but a 45 minute to 1 hour soak was suggested to improve germination


air: All seeds are living beings, and require oxygen. So you want to make sure however you plant them, they wont suffocate. don't use a straight-compost, as it's too clay-like and will be very hard on young seedling roots.

ensure air circulation for seeds by not tightly sealing lids, and poking holes where you can. Using a fluffy soil mix also is important to give seeds air.
heat: You may have seen commercial products out there called seedling mats or heat mats for starting seeds, etc... these are created to mimic the level of heat the sun gives off in early summer to starting-out seeds! Its usually enough to simply put your seedling trays in a warm area of your house such as the top of your fridge, or on your water heater, etc... But some seeds require very intense heat in order to actually germinate. I don't actually know of too many that are relevant to zone 3, but, for example, after a house fire, the author of my seedling book noticed all kinds of new flowers sprouting and growing. Maybe from a wildflower mix or what-have-you. you would think these seeds would just have burned up in the fire, but in reality the fire broke their dormancy. It makes you wonder what our forests would look like after a fire eh? I wonder if we'd have some incredible new growth of species that are otherwise dieing off in the wild.
Although the long tube lights don't provide heat, this screw bulb that was about $7 from home depot does the trick perfectly to provide heat during the day, and cold overnight when it is off.

Roughness: okay, that's not the technical term for it... but some seeds have very hard outer shells. and some need to even be stomped on  or crushed in order for the seedling to emerge from the hard outer shell. Without "nicking" the seeds or "scarification" (aka, scarring the seed shell) the tender seed inside has no access to the moisture and light and warmth you're giving it! :)
scarring seeds to break a tough shell. Shown on a larger seed for photo.
beans do not require scarring, but made a good example for photo.

cold: wait...cold?? YES! some seeds need a cold-spell to break dormancy! In fact, many seeds native to manitoba require this. Most pine seeds, and tree seeds that fall in autumn will not sprout until the following year. Rhubarb and many local flowers as well. With seeds like this that you've purchased or saved yourself indoors, they will need a spell of "stratification" in order to properly germinate.
Hollyhocks, Delphiniums, and Lupines, all sprout better when they are given a fake spring-time thaw experience of being in and out of the fridge.

I happened to purchase several flower seed varieties online and only discovered now, that they require stratification (cold) and some scarification (nicking the outer shell).

fortunately for me, I discovered this 2 weeks before it is time to sew these seeds indoors. So i was great for time to stratify! :)
 For this project, I used paper towels, ziplock bags, water, seeds and a spice grater (cheese grater might work too).

 You will notice these Lupine seeds are actually quite large! Several sources said that scarification was recomended to enhance germination, so I thought i'd give it a shot. :) The other seeds do not require this process.


 So really, all I did was take the seed, and tap it diagonally against my spice grater. (the other saw dust is from nutmeg I grated earlier that day for hot crossed buns! yum!).

 As you can see, the seed is unscratched. Just a tiny part of the outer shell has been nicked off, so that moisture has a place to get in, and the shell has a weak area for the seedling to emerge from.
 Now for the stratification part! It's much simpler than the name implies. Just pour some water into a plate or bowl, fold up the paper towel to fit in the baggies, make it wet, and wring out some of the water (make sure your paper towel is still generously damp).
 Next, spread the seeds out evenly on the paper towel. I do this evenly just incase some sprout in the fridge. Then you can just snip that chunk of paper towel away and plant it like that to not damage the roots.
 Into the ziplock baggie it goes, seeds folded between two layers of wet paper towel. The seed lable is in it's little baggie, inside the ziplock so I dont get my seeds mixed up.
 tada! All ready for stratification! I had five kinds of seeds to stratify. 2 kinds of hollyhocks, 2 delphiniums, and 1 lupines (which were also scarred).

 I popped all the baggies into a square container, just so I don't crush them under other food in my fridge. Once they have moisture in them, seeds are incredibly fragile and tender, unlike when they are dry and dormant.


One week later, I took a peek at my seeds.
 The Lupines are starting to swell up. the delphiniums are slightly larger but otherwise unchanged.
 And the hollyhock seeds look like tiny clamshells, swelling between the two pancake-like layers.

I took out all the seeds, fluffed the bags to give them oxygen, and let them sit on the counter for a couple hours to warm up. Then back into the fridge they went!

8 days after stratification began...
Several days later (8 days after I first began stratifying the seeds), I peeked at the seeds again. The hollyhocks and Dalphiniums were still the same, but the scarred Lupine seeds were looking quite a big more lively yet. Undeniably so...
close up, 8 days into stratification

I can't really just keep stratifying them at this point. The reality is, when the seedling emerges, the root needs nutrients, and those first tiny leaves need some kind of light source. So that means it's time to plant these!
 I used my standard Mel's mix (equal parts peat moss, vermiculite and compost), kept it nice and fluffy while wet, and then gently placed each seed into a pot. I save my seedling containers from year to year, and use them when starting seedlings.
 Remember, a sprouted seed is very delicate and easily crushed. So I didnt poke these down into the soil. Instead I gently crumbled some wet soil overtop of them. Not very much, just enough to make the seed not visible.

Then it's a greenhouse cover, and under the cooler tube lights until sprouting time! :) That way these little lupine's will have everything they need when they wake up.

Until next time, keep those thumbs  green!